FreePOOMA is an open source project for physics. The FreePOOMA web site describes the project like this:
FreePOOMA is a C++ library supporting element-wise, data-parallel, and stencil-based physics computations using one or more processors. The library automatically handles all interprocessor communication, obviating the need for any explicit communication code. The library supports high-level syntax close to mathematical or algorithmic syntax (like Fortran 95), easing the conversion from algorithms to code.
You can find the FreePOOMA project here: FreePOOMA web site
And a useful manual for the project here: POOMA manual
But the instructions for building FreePOOMA on a Macintosh cover the old CodeWarrior development environment. So this post will show the steps needed to build FreePOOMA on a modern Macintosh computer and create XCode projects that use FreePOOMA.
Getting FreePOOMA Source Code
To get the FreePOOMA source go to the download page and download their zipped tarball, or just click this link. Unzip the file using Stuffit Expander or a similar tool. UNIX geeks can open a terminal and type tar xzvf pooma-2.4.1.tgz.
Configure FreePOOMA
Before FreePOOMA can be built, it must be configured. To do this, follow these steps:
*) Open a terminal window. You can do this by typing "terminal" in Spotlight and starting the terminal application.
*) Use the "cd" command to change to the FreePOOMA root directory. The location of this directory is based on the location where you unziped the tarball. An example command would be cd /Users/[UserName]/Desktop/freepooma-2.4.1.
*) Type ./configure --arch LINUXgcc and hit return.
*) Type export POOMASUITE=LINUXgcc and hit return.
*) Type make and hit return.
This will create a file named PoomaConfiguration.h in the lib/LINUXgcc under your FreePOOMA directory.
We've now successfully created the FreePOOMA library! Navigate to the lib/LINUXgcc directory and look for a file named libpooma-gcc.a. This is the FreePOOMA library.
Creating A FreePOOMA XCode Project
Now we want to test using the FreePOOMA library in XCode. To do this, follow these steps:
*) Start Xcode and create a new Cocoa application project. Name the project.
*) Open a Finder window and navigate to the folder containing the libpooma-gcc.a FreePOOMA library.
*) Drag and drop the library file into your project. Check the option copy the file into the project.
*) Select the project icon at the top of the Groups & Files window.
*) Right click and select Get Info from the popup menu.
*) Select the Build tab.
*) Navigate to the Search Paths section of the build options.
*) Add a path to the FreePOOMA headers. Where this is located depends on where you downloaded the source code. Here is an example path: /Users/[UserName]/Desktop/freepooma-2.4.1/src
*) Click the "Recursive" check box so that all subdirectories will be searched.
*) Add a path to PoomaConfiguration.h. Where this is located depends on where you downloaded the source code. Here is an example path: /Users/[UserName]/Desktop/freepooma-2.4.1/lib
*) Click the "Recursive" check box so that all subdirectories will be searched.
*) Save these changes and exit the project info window.
*) Rename the file main.m to main.mm.
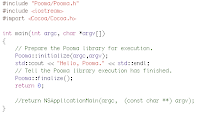
The above steps perform all the setup you need for using FreePOOMA in an XCode Cocoa application. Now lets write a sample app. Open the main.mm file and edit it so that it looks like the picture below (click the picture for a larger image):

Click the "Build and Go" button and step through the app to make sure everything is working.


Инстраграмм остается самой популярной площадкой для продвижения своего бизнеса. Но, как показывает практика, люди гораздо чаще подписываются на профили в каких уже достаточное количество подписчиков. Если заниматься продвижение своими силами, потратить на это вы можете очень немало времени, поэтому еще лучше обратиться к специалистам из Krutiminst.ru тут https://www.openstreetmap.org/user/RennaPerin2
ReplyDelete